


Hello, hope your weekend was great!! I have been very busy with the end of the school coming soon!!! My kids will be done this Thursday for the summer and we have just been going a little crazy with all the end of the year stuff!!! Even though I have not forgotten my bloggy friends!! I want to show you all the Flower Pot I made for my son's teacher. He is in Pre-school so I thought this would be nice for his teacher to keep on her desk. My older two kids just have toooo many teachers so chose to only make this for my little guy's teacher. I used Karlee's, from KarleeKrafts, idea but tweeked it a bit to make it functional. Click here to see her post. I just think it is the cutest idea for any occasion!!!
I have entered this into the "Made it Myself Mondays" link up over at You Had me at Craft. So head on over by clicking on the blinkie on the right side of this blog, link up and enter to win!! Good Luck!!
I have entered this into the "Made it Myself Mondays" link up over at You Had me at Craft. So head on over by clicking on the blinkie on the right side of this blog, link up and enter to win!! Good Luck!!
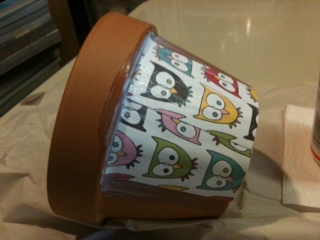
Now for my project, I started with the paper, I used 1 sheet of American Crafts Owl paper and 1 sheet of a coordinating mauve color. These papers were more like cardstock and a bit thick, but I loved the Owl's sooo much I worked the paper so it would stay down. Next time I think I will try to find a thinner paper!!! I cut them into 3 1/4" and 2 1/4" squares.


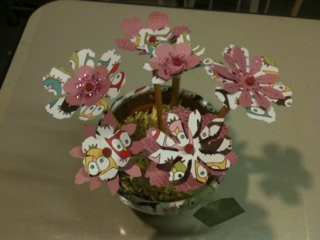
Then I cut flowers out of both sheets using my Cuttlebug and the Tim Holtz Tattered Florals Die. Once they were cut I embossed the mauve ones with the "Mesh" Cuttlebug folder.

Once the flowers were cut I punched a hole in the middle of all the flowers so I could put them on the sharpened pencils, this was a bit difficult because the largest hole on my Big Bite was just a little too small, but with a little patience you can work the flowers onto the pencils!! I then added some pink Stickles to the insides of the solid colored flowers.

I then took all the 31/4 squares and Mod Podged them to the flower pot. Be sure to cut some slits on the top and bottom of the squares so that you can easily roll them to fit under the rim of the pot.

I added floral foam to the inside of the pot and some Easter fluff (in yellow) to cover the foam. Pushed the pencils into the foam, added a tag and Teachers name and Presto...Pencil Flower Pot!!!

I just really love the idea of this project!! It took a little while to cut the flowers and the squares but once you have done that part the rest is cake!!
I hope you all have a smooth transition at the end of this school year and that your summer is full of fun and crafts!!
I would love to see what you all have made for the teachers in your life so please send me pic's of your teachers gifts, I really love learning of new things to make!!
Until next time Happy Craftin!!
Ildi
Until next time Happy Craftin!!
Ildi


4 Appreciated Comments:
wow wow wow isn't this fantastic.....thanks for visiting me today...hugs
dropped in from MIMM. SUch a lovley idea.
Cheers from Bangalore ,India
Dr Sonia S V
http://cardsandschoolprojects.blogspot.com
very pretty flowers, I have made some origami today that serve to form a bouquet, as given me an idea to mount so I did and give it to my wife, a greeting from someone who makes origami and traditional and digital scrapbook
wow sooo stinkin CAAAUTE!!!! Im gonna try this! :)
Micia/ yellowbirdcreation
Post a Comment